FAQ Overview

Ispconfig

Ispconfig automail

With our plugin ISPConfig Automail you can automatically configure email clients like Thunderbird or Outlook.

If you use one or more mail servers for the domains makes no difference. Just define the appropriate data such as host name and port for each mail server. everything else is done through a small web page that provides an Autoconfig service (Thunderbird) or Autodiscover service (Outlook).

Autoconfig and Autodiscover request XML files via different addresses, to configure the email client according to your specifications.

To use the ISPConfig Automail, you only need a current version of ISPConfig and a website (Apache or nginx).

The plugin consists of two parts

  • the interface plugin for ISPConfig to manage the settings
  • a script to generate the relevant XML documents under the respective domain

In this example example.com is your domain, over which the automatic setup of the mail clients will run. You are free to choose this domain. The domain client.com is the domain that queries example.com for the setup.

Install ISPConfig Automail

cd /tmp

wget https://download.schaal-it.net/ispconfig-automail.tgz

tar xfz ispconfig-automail.tgz

cd automail

php install.php

Activate the plugin

Log in to ISPConfig as admin, go to System / CP User and activate the module automail for the user admin. After you have logged off and on again, the module is available for you.

Remote-User

Create a remote user who can use the “automail functions”. If you have a multi-server setup, you may need to allow remote access.

Configure the plugin

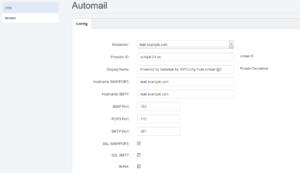
Under Provider-ID you enter a unique ID that identifies your setup. You can use the domain name of your server.

The two Hostnames are the names by which mails are retrieved (IMAP/POP3) and sent (SMTP). If you run everything on the same server, you must enter the same name in both fields.

For Ports, enter the ports that should be used for your mail server.


ISPConfig Automailer Setup


Create the required DNS records

You need an A-record for autoconfig.example.com and autodiscover.example.com pointing to your web server. If you use IPv6, you should also create AAAA records.

Create two entries in each customer domain. A simple CNAME is enough for autoconfig:

autoconfig.client.com. CNAME autoconfig.example.com.

For autodiscover an SRV record is recommended. This will give you a certificate warning during setup, but it is the easiest way to set up any number of customer domains:

_autodiscover._tcp.client.com. SRV 0 0 443 autodiscover.example.com.

Create the website in ISPConfig

Now you have to create the website autoconfig.example.com with PHP support and without auto subdomain in ISPConfig. You should also secure this site using SSL. This is not required for autoconfig, but will be needed later for autodiscover. You can easily use Let’s Encrypt

You have to set the directives for Apache or nginx accordingly:

Apache

ServerAlias autoconfig.*

nginx

location ^~ /config\.php { deny all; }


location / { 

rewrite autodiscover\.xml$ /index.php last; 

rewrite Autodiscover\.xml$ /index.php last; 

rewrite config-v1\.1\.xml$ /index.php last; 

}

server_name autoconfig.*;

With alias or server_name this domain can be used later by any customer or email domain.

Create the alias domain autodiscover.example.com and point it to autoconfig.example.com. You don’t need any redirects, the important thing is that the domain has an SSL certificate. A-Records in DNS are enough to point to your web server so you can use Let’s Encrypt.

Upload the script to the webseite

Upload the files from the website directory from the archive to the newly created website and adjust the data in config.php. Rename the htaccess to .htaccess. If you use nginx, you can also delete the file directly.

Test

You can easily test Autoconfig via wget:

wget http://autoconfig.client.com/config-v1.1.xml?emailaddress=test@client.com -O test

In the file test you will find the result. The email address must exist of course.

For Autodiscover there is the Microsoft Remote Connectivity Analyzer.

Szerző: : Rónai Tamás
Utolsó módosítás: 2020-06-26 21:27


Letsencrypt tanusítvány a szolgáltatásokra

LE4ISPC (Single or Multi Server Setup)

Let's Encrypt With Auto Updater is for ISPConfig 3 (Single or Multi Server Setup) and other services like Postfix+Dovecot, Pure-ftpd, Monit etc. It will automatically create Let's Encrypt for any ISPConfig server hostname FQDN if none exists; and secure its control panel and other services; if they are available and installed. The script is meant for Debian, Ubuntu and other similar derivatives as the server OS.

LATEST HOW-TO

In your terminal, in root mode, simply run this after you have installed any of your ISPConfig server build:

cd /etc/ssl
wget https://raw.githubusercontent.com/ahrasis/LE4ISPC/master/le4ispc.sh
chmod +x le4ispc.sh
./le4ispc.sh

Note: You can add "--no-check-certificate" at the end of wget line if it is an issue to you.

OLDER HOW-TO'S

https://github.com/ahrasis/LE4ISPC/tree/master/old/nginx

https://github.com/ahrasis/LE4ISPC/tree/master/old/apache


Szerző: : Rónai Tamás
Utolsó módosítás: 2020-06-27 08:02


Installing several PHP versions with ispconfig3 and Ubuntu 18.04

 
Since spam comments have been abused, it is necessary to register to leave comments


These steps MUST be performed as ROOT.

It must be clear to everyone that PHP is updated to the latest version and the maintainer packages are overwritten.

1. Bring system up to date


Code
apt-get update
apt-get upgrade


2. Add Sury.org to the source.list


Code
apt-get install apt-transport-https lsb-release ca-certificates
add-apt-repository ppa:ondrej/php
apt-get update
apt-get upgrade


3. Install PHP versions

As of PHP 7.2, the "php-mycrpt" package is no longer available


PHP 5.6:

Code
apt-get -y install php5.6 php5.6-common php5.6-fpm php5.6-gd php5.6-mysql php5.6-imap php5.6-cli php5.6-cgi php-pear php5.6-mcrypt php5.6-curl php5.6-intl php5.6-pspell php5.6-recode php5.6-sqlite3 php5.6-tidy php5.6-xmlrpc php5.6-xsl php-memcache php-imagick php-gettext php5.6-zip php5.6-mbstring php5.6-soap php5.6-common php5.6-opcache php5.6-mysql


PHP 7.0

Code
apt-get -y install php7.0 php7.0-common php7.0-fpm php7.0-gd php7.0-mysql php7.0-imap php7.0-cli php7.0-cgi php-pear php7.0-mcrypt php7.0-curl php7.0-intl php7.0-pspell php7.0-recode php7.0-sqlite3 php7.0-tidy php7.0-xmlrpc php7.0-xsl php-memcache php-imagick php-gettext php7.0-zip php7.0-mbstring php7.0-soap php7.0-common php7.0-opcache php7.0-mysql


PHP 7.1

Code
apt-get -y install php7.1 php7.1-common php7.1-fpm php7.1-gd php7.1-mysql php7.1-imap php7.1-cli php7.1-cgi php-pear php7.1-mcrypt php7.1-curl php7.1-intl php7.1-pspell php7.1-recode php7.1-sqlite3 php7.1-tidy php7.1-xmlrpc php7.1-xsl php-memcache php-imagick php-gettext php7.1-zip php7.1-mbstring php7.1-soap php7.1-common php7.1-opcache php7.1-mysql


PHP 7.2

Code
apt-get -y install php7.2 php7.2-common php7.2-fpm php7.2-gd php7.2-mysql php7.2-imap php7.2-cli php7.2-cgi php-pear php7.2-curl php7.2-intl php7.2-pspell php7.2-recode php7.2-sqlite3 php7.2-tidy php7.2-xmlrpc php7.2-xsl php-memcache php-imagick php-gettext php7.2-zip php7.2-mbstring php7.2-soap php7.2-common php7.2-opcache php7.2-mysql


PHP 7.3

Code
apt-get -y install php7.3 php7.3-common php7.3-fpm php7.3-gd php7.3-mysql php7.3-imap php7.3-cli php7.3-cgi php-pear php7.3-curl php7.3-intl php7.3-pspell php7.3-recode php7.3-sqlite3 php7.3-tidy php7.3-xmlrpc php7.3-xsl php-memcache php-imagick php-gettext php7.3-zip php7.3-mbstring php7.3-soap php7.3-common php7.3-opcache php7.3-mysql


4. Reset PHP to default in Ubuntu

By installing the new PHP packages, the default PHP version in Debian has been changed to the latest PHP version. This can cause problems with some applications, so we reset it to default.


For Ubuntu 18.04 we choose: PHP 7.2


DO BOTH commands and set BOTH to DEFAULT:

Code
update-alternatives --config php
update-alternatives --config php-cgi


5. Setup in ispconfig3

We log in with an ADMIN account in ispconfig.


Then we navigate to:


There we add by adding: "Add new PHP version", one after the other:


PHP 5.6


Tab "Name"
Server: Select the server here

Name: Give a name here


Tab "FastCGI Settings"

Path to PHP FastCGI Binary: php5.6-cgi

Path to the php.ini directory: /etc/php/5.6/cgi/php.ini


Tab "FPM Settings"

Path to PHP-FPM init Script: php5.6-fpm

Path of the php.ini directory: /etc/php/5.6/fpm/php.ini

Path to PHP-FPM Pool Directory: /etc/php/5.6/fpm/pool.d


PHP 7.0


Tab "Name"
Server: Select the server here
Name: Give a name here


Tab "FastCGI Settings"

Path to PHP FastCGI Binary: php7.0-cgi

Path to the php.ini directory: /etc/php/7.0/cgi/php.ini


Tab "FPM Settings"

Path to PHP-FPM init Script: php7.0-fpm

Path of the php.ini directory: /etc/php/7.0/fpm/php.ini

Path to PHP-FPM Pool Directory: /etc/php/7.0/fpm/pool.d


PHP 7.1


Tab "Name"
Server: Select the server here
Name: Give a name here

Tab "FastCGI Settings"

Path to PHP FastCGI Binary: php7.1-cgi

Path to the php.ini directory: /etc/php/7.1/cgi/php.ini


Tab "FPM Settings"

Path to PHP-FPM init Script: php7.1-fpm

Path of the php.ini directory: /etc/php/7.1/fpm/php.ini

Path to PHP-FPM Pool Directory: /etc/php/7.1/fpm/pool.d


PHP 7.2


Tab "Name"
Server: Select the server here
Name: Give a name here

Tab "FastCGI Settings"

Path to PHP FastCGI Binary: php7.2-cgi

Path to the php.ini directory: /etc/php/7.2/cgi/php.ini


Tab "FPM Settings"

Path to PHP-FPM init Script: php7.2-fpm

Path of the php.ini directory: /etc/php/7.2/fpm/php.ini

Path to PHP-FPM Pool Directory: /etc/php/7.2/fpm/pool.d


PHP 7.3


Tab "Name"
Server: Select the server here
Name: Give a name here

Tab "FastCGI Settings"

Path to PHP FastCGI Binary: php7.3-cgi

Path to the php.ini directory: /etc/php/7.3/cgi/php.ini


Tab "FPM Settings"

Path to PHP-FPM init script: php7.3-fpm

Path of the php.ini directory: /etc/php/7.3/fpm/php.ini

Path to PHP-FPM Pool Directory: /etc/php/7.3/fpm/pool.d


Thus, all versions are registered in ispconfig and can be used individually from now on.

6. Restarts of services

Now all services are being restarted:


Code
systemctl restart php5.6-fpm
systemctl restart php7.0-fpm
systemctl restart php7.1-fpm
systemctl restart php7.2-fpm
systemctl restart php7.3-fpm
systemctl restart apache2


If you liked the tutorial, give me a coffee (top right).

Szerző: : Rónai Tamás
Utolsó módosítás: 2020-10-18 07:35